2018年11月27日 星期二

NEW VITARA大燈更換+改裝 NEW VITARA headlight replacement + modification

這不是推坑~~這是一個有年紀的人一時不能接受太新的東西所產生的PO文
進口到台灣的NEW VITARA  大燈的近光燈都使用LED白光的照明.
除了光色偏白之外不能更換LED也是一個問題
一旦近光燈損壞那就只有換整顆大燈總承.....這筆費用相當恐怖!
加上在台灣經常會有下雨或起霧的天候....此時近光燈的白光在這種天候下就等於是廢物了.
雖然可以搭配周邊其他的光源但是總覺得還是應該要改善這個問題至少對我來說他是一個問題!

在大陸的市場裡銷售的VITARA款式中~低配的近光燈是使用H11傳統石英燈泡..
因此我特別去淘了一對所謂的『低配』大燈總承回來...
台灣進口的鏡框的邊框是使用紅色框~~大陸的低配大燈是銀白色框!
其餘的配置都一樣.
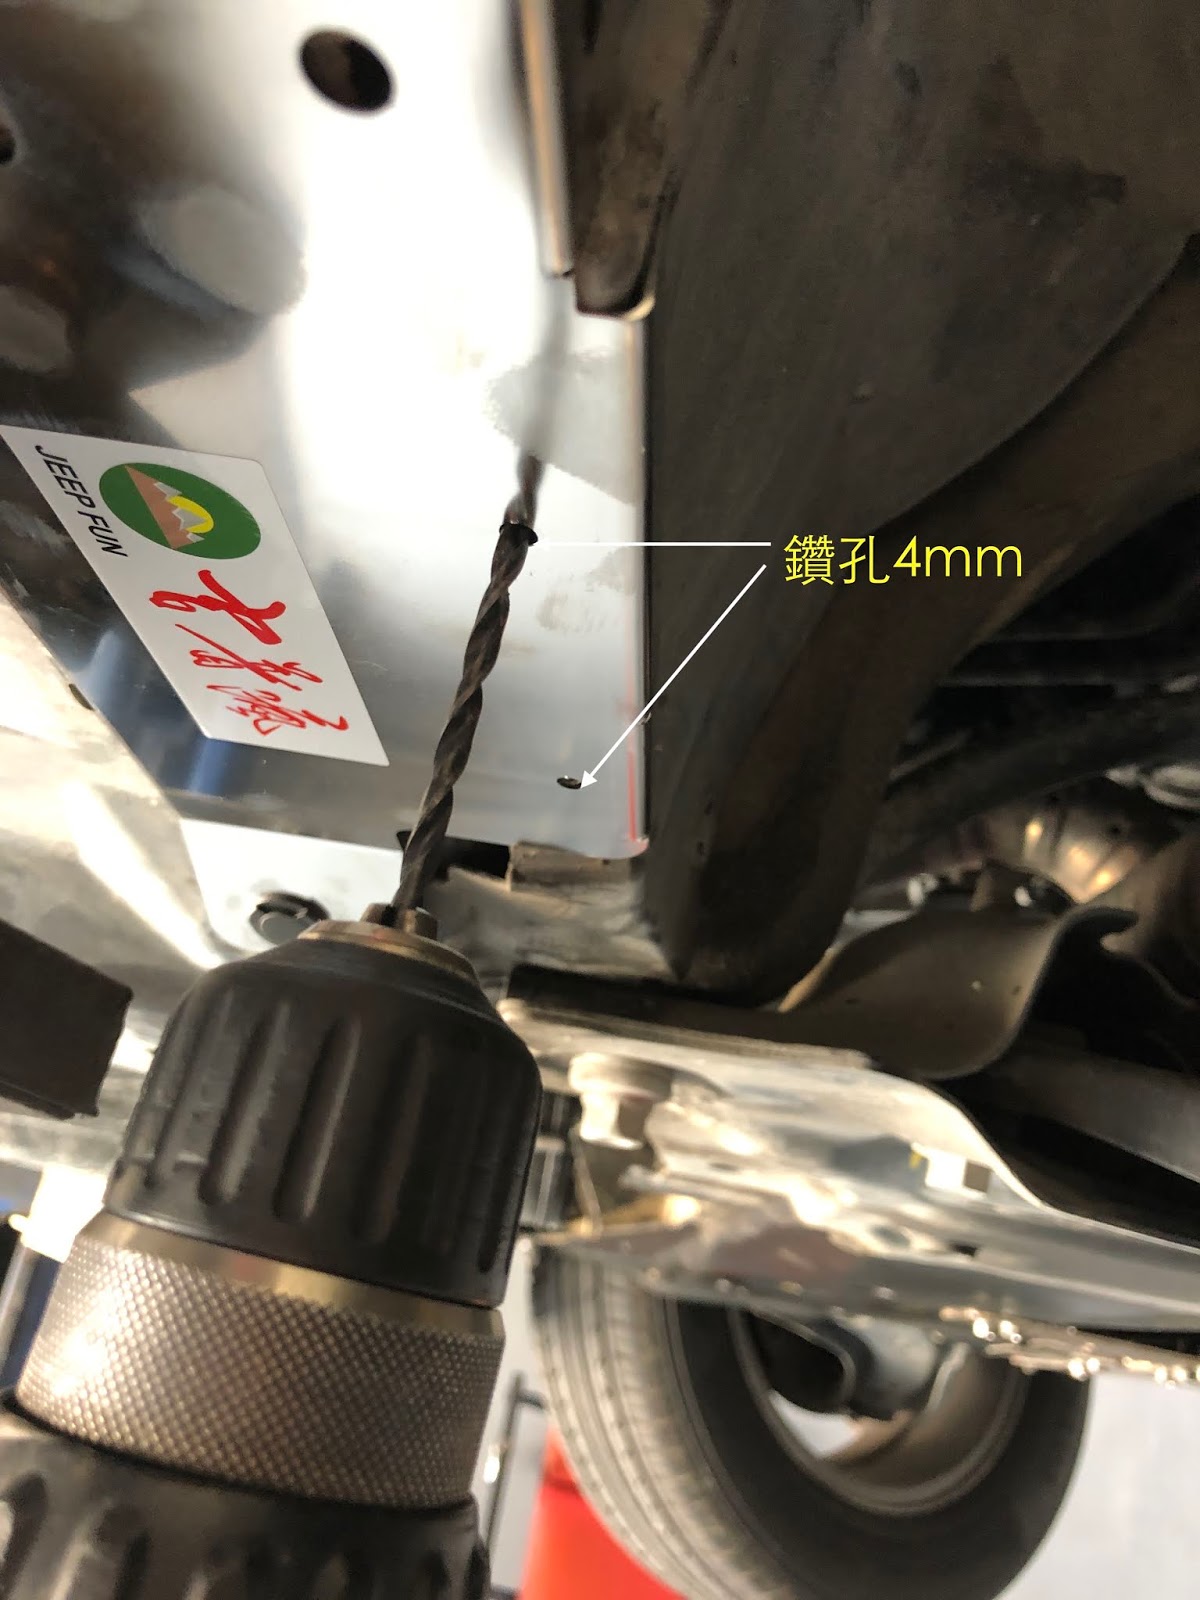
除了換上大燈總承外,近光燈因為是H11~~所以需要更改近光燈的燈泡端子.
趁這個機會採用陶瓷端子.可以承受高溫...同時外接一條接地線 為以後因線組老化導致阻抗上升..造成亮度減退做準備!
This is not a push pit~~ This is a PO text produced by an elderly person who cannot accept too new things at a time.
The low beam lights of the NEW VITARA headlights imported into Taiwan use LED white light.
It is also a problem that the LED cannot be replaced except that the light color is white.
Once the low beam is damaged, it is only a change of the whole headlight..... This cost is quite scary!
In addition, there is often rain or fog in Taiwan.... At this time, the white light of the low beam is equivalent to waste in this weather.
Although it can be used with other surrounding light sources, I always feel that I should improve this problem~~ At least it is a problem for me!

In the VITARA style sold in the mainland market, the low-profile low beam is using H11 traditional quartz bulb..
Therefore, I went to buy a pair of so-called "low-profile" headlights.
The frame of the frame imported from Taiwan is a red frame~~The low headlights of the mainland are silver-white frames!
The rest of the configuration is the same.
In addition to changing the headlights, the low beam is H11~~ so you need to change the lamp terminal of the low beam.
Use this opportunity to replace the ceramic terminal. It can withstand high temperatures...

At the same time, an external grounding wire is used to increase the impedance due to aging of the wire group.


左邊是傳統大燈~~~~右邊是LED大燈
On the left is the traditional headlight ~~~~ on the right is the LED headlights


LED近光燈的大燈總承
Headlights Assy for LED low beam


石英近光燈的大燈總承
Headlights Assy for quartz low beam


H11 陶瓷端子
H11 ceramic power plug


線組改裝
Line group replacement


預留接地線
Reserved ground wire


H11 石英燈泡近光燈的照射
H11 quartz bulb low beam illumination


近光燈的照射情況
The situation of low beam illumination


近光燈+遠光燈全開
Low beam + high beam lights are all on


所有照明全開
All lighting is fully open


完成的結果~還是黃色燈光比較習慣!
而且有損壞的話可以單獨更換燈泡,同時也可以根據使用的環境需要選擇適合的燈泡!
如果真的那麼喜歡LED~~~那用這一組低配大燈總承...以後就可以採用LED的H11燈泡...至少它是可以更換的 !
The result ~ is still a habit of yellow light!

And if there is damage, you can replace the bulb separately, and you can also choose the appropriate bulb color temperature according to the environment you need!

If you really like LED~~~ you can also use this group of low-profile headlights... you can use LED H11 bulbs...
At least it is replaceable!


2018年11月23日 星期五

吉普瘋 NEW VITARA 底盤護板安裝程序

VITARA 底盤護板建議安裝順序

準備工具:
十字起子
套筒板手 10mm/14mm/17mm
4mm鑽頭+電鑽
剪刀
Preparation tools:
cross screwdriver
Sleeve wrench 10mm/14mm/17mm
4mm drill bit + electric drill
scissors


 1. 先拆除引擎下方原廠的塑膠護板.包含前保險桿下護板+引擎下護板
前保險桿下護板拆除時需要用一些蠻力拉出來..因為都是塑膠製品請不用擔心!
First remove the original plastic guard under the engine. Including the front bumper under the guard + engine under the guard
When the front bumper lower guard is removed, it needs to be pulled out with some brute force. Because you are all plastic products, please don't worry!


2.  安裝Intercooler金屬進氣濾網
    Install Intercooler metal air filter

請注意~濾網四周邊緣必須放在箭頭位置
Please note ~ the edge of the filter must be placed at the arrow position


請用套件中的束帶按照片中方式固定
Please use the strap in the kit to fix it in the photo.


將多餘的束帶剪掉~就完成了!
Cut off the excess band~ and it's done!


3.安裝前保桿下護板 & 引擎下護板
Front guard plate under guard & engine under guard


先將引擎下面護板箭頭指的三個位置裝上去~螺絲先不要鎖緊
同時請注意照片下方二個箭頭的位置..這將是補強片要放置的位置.
First install the three positions indicated by the arrow on the underside of the engine.
Also note the position of the two arrows below the photo. This will be where the reinforcing iron piece is to be placed.


將套件中的墊片放進原有的螺絲中
Put the gasket in the kit into the original screw


前面的固定位置~螺絲暫時不要鎖緊.方便後續的調整
The front fixed position ~ the screw is not locked for the time being. It is convenient for subsequent adjustment.


引擎下面護板~後面螺絲的固定方式
右邊照片金屬件,是為了補強原廠固定位置強度不足增加的零件!
Fixing method of the underside of the engine to the rear screws.
The photo metal on the right is to reinforce the parts of the original fixed position with insufficient strength!


 引擎下護板補強片要放置的位置
Where the underside of the engine is to be placed to reinforce the iron piece to be placed.


 補強片放置的方式
Ways to reinforce the placement of iron pieces.


 搭配長螺絲固定的順序
Mounting sequence with long screws.


補強片完成安裝的狀態
Reinforcing the iron piece to complete the installation status.

請注意~安裝程序到目前為止,所有的螺絲都尚未鎖緊 !
Please note ~ the installer so far, all the screws are not locked!

 
安裝前保險桿下護板,箭頭所指四個14mm螺絲請先螺絲套上墊片後安裝.~~螺絲不要鎖緊!
Install the front bumper lower guard plate. The four 14mm screws indicated by the arrow should be installed after the screw is placed on the washer. ~~ Do not lock the screw!


安裝前面保險桿護板時.箭頭位置有時候會互相勾住,造成位置的調整困難~請注意! 
When installing the front bumper guard. The arrow positions sometimes hook each other, making the position adjustment difficult~ Please note!


安裝護板中央 三個橫向的10mm螺絲,可以用小起子調整位置!
Install the center of the guard plate Three horizontal 10mm screws, you can adjust the position with a small screwdriver!


 .
將剩餘的螺絲全部安裝上去.暫時不要鎖緊.方便調整位置...確認都沒有問題後在全部鎖緊
照片中的鐵板螺絲~注意箭頭位置要安裝確實!
Install all the remaining screws. Do not lock them temporarily. It is convenient to adjust the position... Confirm that there is no problem and then lock them all.
Iron plate screws in the photo ~ Note the position of the arrow to be installed!


安裝護板前方, 請用套件中的10mm螺絲和墊片,固定保險桿!
Install the front of the guard plate, please ask the 10mm screws and washers in the kit to fix the bumper!


完成安裝的照片
Completed installation photo


4.安裝側面裝飾板的下護板
Installing the lower guard of the side trim panel

 
使用原車上的塑膠扣掀固定護板這個位置
箭頭位置需要用一些力量安裝進去!
Use the plastic buckle on the original car to fix the guard plate first.
The arrow position needs to be installed with some strength!


使用4mm鑽孔這兩個位置, 在塑膠板上!
Use 4mm drilled holes in two positions on the plastic plate!


取下護板,放上螺絲夾片.白色的圓圈是為了下一個步驟安裝護板時方便辨識.
Remove the guard and place the screw clip. The white circle is for easy identification when installing the guard in the next step.


使用套件中的螺絲固定護板
Secure the guard with the screws in the kit


完成照片~請注意~這件護板是車輛兩邊都需要安裝.程序一樣!
Finish the photo ~ Please note ~ This shield is required to be installed on both sides of the vehicle. The same procedure!


5.安裝後差速器護板

 
先將排氣管用繩子固定!
分開中段排氣管和消音器
First fix the exhaust pipe with a rope!
Separate the middle exhaust pipe and silencer.


將照片中四顆17mm螺絲按順序 A>B>C>D 拆除.裝上護板後再用同樣的順序安裝完成.
將排氣管裝回去,拆下繩子!
Remove the four 17mm screws in the photo in the order of A>B>C>D. Install the guards and install them in the same order.
Put the exhaust pipe back and remove the rope!